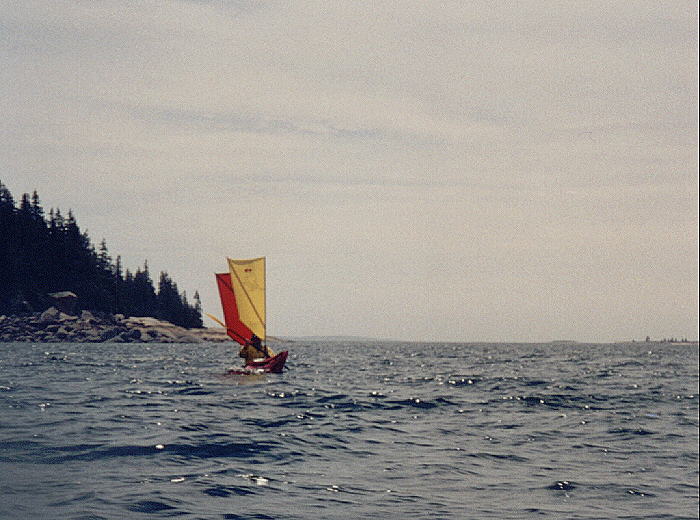
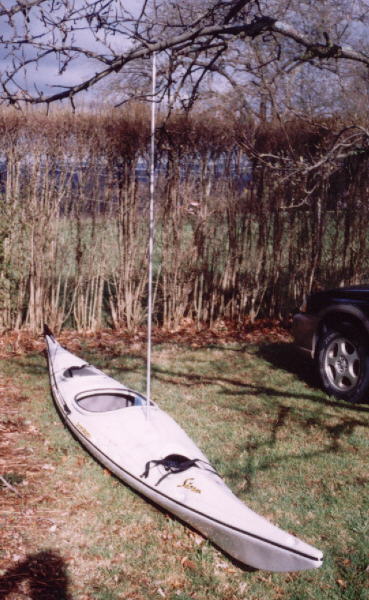
I was mainly concerned with fitting mast steps ( front and rear ) and sails to these two kayaks - to go to sea without them is like going out without a paddle. But I made a number of other changes as well. The front bulkhead was way in front of where it needed to be, therefore letting more water in the cockpit in the event of a capsize, and restricting the space for storing gear in the front compartment. I also threw the backrest away and fitted a strap across the back of the seat, because when you are sitting on the back deck and sliding down into the cockpit, the backrest had a tendency to fold down so you ended up sitting on it. And to paddle efficiently you should not have a back rest anyway. The deckline was made continuous all the way round, and plastic tubing slid over the sections of the deckline each side at the bow and the stern. We always use the deckline for lifting the kayak, particularly on a long trip when they are fully loaded. With four people, one each side front and back, the plastic tubing on the decklines makes a very comfortable handgrip for carrying the kayaks from the low tide mark to the campsite. If there are only two people, then one carries from one side at the front, and the other from the opposite side at the rear. (An Old Town kayak with similar rig)
Mast
steps: (back to
top)
The first important step was to fit the mast steps in the front deck.
These have to take an enormous strain when sailing in a good wind, so
need
to be solid indeed.
Mast: I always use 3/4 inch
aluminium tube, about 76
inches long - but this depends a bit on how big a sail you are going to
make, and how much room you have on the deck. I chose this length for
the
Storm, as it fits comfortably on the front deck. Any longer and it
would
be a nuisance.
But finding 3/4 inch tube turned out to be a problem. We had to go down to Brewster NY for a week or so, so I took one of the kayaks along to start on it. I got a length of 3/4 inch tubing from Meekers Hardware store in Danbury, Conneticut, and a piece of 5/8 wooden dowel to glue inside the mast to help stop it bending. The dowel is a nice neat fit inside 3/4 inch tube. They only had one length of aluminium tube, but I assumed I could pick up three more at any hardware store near Wolfeboro NH when we went home. Later on I did buy a length at an Ace hardware store, only to find that when we got it home, the 5/8 dowel would not fit inside it. Careful measurement showed it to be 11/16 inch tubing, not 12/16 - or 3/4 as labelled. We returned it and I made it clear I wasn't very impressed. After a few weeks of trying to locate the correct stuff, I ended up ringing Meekers store and ordering three more lengths from them - which they would have to order in specially for me. We would be revisiting Brewster in a weeks time and would pick it up. Incidentally, this is a marvellous old-fashioned hardware store run by two ladies. It is well worth a visit even if you don't want anything.
So I use epoxy glue and glue 3 feet of dowel inside one end, and a few inches of dowel at the other end, leaving a small part of this sticking out. This can be rounded off so it won't poke through the top of the sail material.
Mast step
(front sail) (back
to top)
For the mast step in the deck I located 1 inch grey plastic electrical
conduit at Home Depot. This is exactly the right size for the 3/4 inch
mast. One end of the conduit is flanged out to join another piece into
it. This flange stops the mast step from being forced down inside the
kayak.
Sit in the seat and reach forward with one hand to where you think
you can put the mast in and out - the further forward the less it will
interfere with your paddling. I drilled a 1 inch hole here, then
carefully
enlarged it with a round file till the conduit could be forced into it.
In a normal fibreglass kayak in Tasmania I would fibreglass this in
place,
but not so with these plastic things. I ended up with a piece of
plywood
from side to side under the deck, fastened in place with aluminium
strips
bolted through the deck. Then I sit the kayak on level ground, making
sure
it is perfectly upright. Force a 6 inch length of conduit into the hole
in the deck, and carefully stand the mast in it.
 Lining
up the mast.
Lining
up the mast.
Walk all around the kayak, making minor adjustments till the mast looks
vertical from all angles. Use a marking pen to draw a circle round the
mast on the plywood. Then take the plywood out and put a hole where
marked.
I then put a piece of 1 inch aluminium angle across the plywood, right
against where the mast step will be, before refitting it. The plastic
conduit
mast step will now go down through this hole, and be extremely rigid.
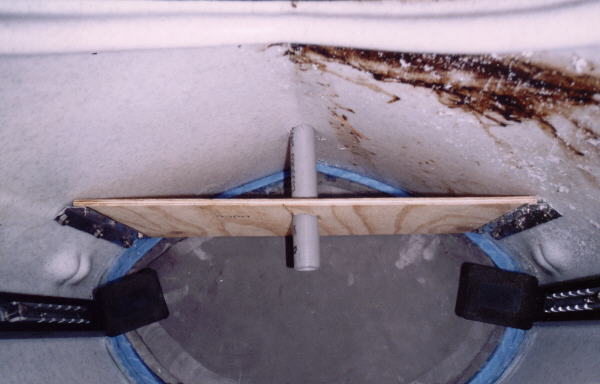 These
also shows the bulkhead has been moved further aft.
These
also shows the bulkhead has been moved further aft.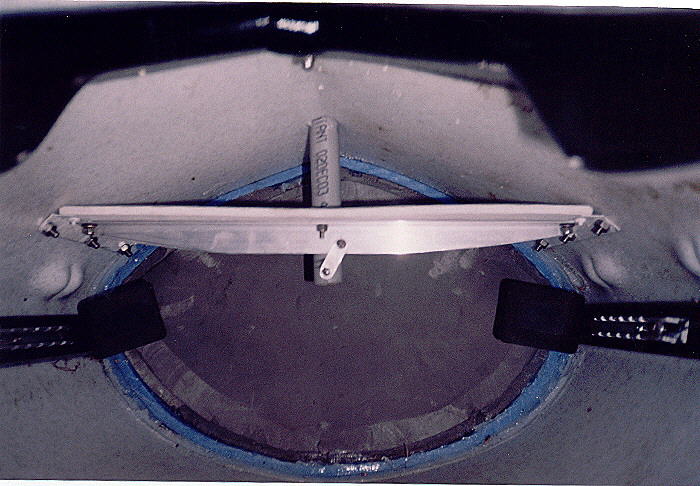
Make a 1 inch long plug to block off the bottom of the mast step to
keep water out of the cockpit. Put a small stainless steel or brass
bolt
through the plug to stop it falling out, and maybe a small piece of
aluminium
under this bolt, to also bolt it to the angle. This should keep it
firmly
in place. Naturally seal round the mast step with some silicon. The
best
silicon I found was Sudbury Elastomeric Marine Sealant, although
Current
Designs (the manufacturer of these kayaks) says they use Kop-r-lastic
to
fix the bulkheads in place. You might find this in Home Depots, or
WalMarts.
Above the deck cut off most of the flange sticking up, leaving about
an 1/8 of an inch - just enough to stop the step being forced down
through
the deck.
So now we have a very rigid mast step fitted, and a 3/4 inch mast,
reinforced with 5/8 dowel - ready for the sail.
Sails:
(back
to top)
The sails are made from rip stop nylon - readily available from Jo-Anne
fabrics. We made all four the same size.
I start with the fabric cut to a rectangle 31" by 61". This allows
3 1/2" for the pocket to
fit on the mast, and 1
1 /2" for the hem round the rest of
the sail. You will
end up with a sail 26"wide. The pocket for the boom is sewn on
separately.
The boom needs to be angled up to help keep it out of the way
when paddling,
and also to let you look underneath it. Measure about 13" up from the
bottom
on one side and draw a line from there to the bottom of the other
side.You
could just cut this triangular piece off, but to get a slightly better
shape to the sail try this. Find the centre of this line and measure
down
at right angles to it - 1 inch. Then try drawing a curve through this
point,
and cut along this curve. Then when the straight boom pocket is sewn on
you will have a bit of 'belly' in the sail.
 I have exaggerated the
curve here to make it clear.
I have exaggerated the
curve here to make it clear.
I also measure 3" down from the top on the same side and cut that
triangular
piece off as well - otherwise when you fold the sail up, the batten
will
protrude well above the top of the mast. It will anyway, this just
lessens
it a bit. (In actual fact with the yellow sail I used a much longer
batten,
and did not cut this little piece off the top.)
The fibreglass battens are 39" long, but this is not at all critical (the batten on the yellow sail is 55" long)
I used 5/8" wooden dowel for the boom, 30" long. To stop the wood splitting where the bolt goes through the mast fitting, I glue a 1 inch piece of mast aluminium over it.
Now I am not going to tell you how to sew - you'll have to work that out for yourself. There needs to be a pocket down the side for the mast to fit into - the sail stays permanently on the mast. From the top of the mast down to where the batten is, the pocket should be a very tight fit - you don't want it ever freely sliding off the mast. From there down the pocket needs to be a bit looser, as when you fold the batten against the mast for stowing, the sail will want to slide up the mast slightly. Inside the hem across the top of the sail I attach a thin piece of 'platted builders line'at the mast end. The other end at the top of the batten can be tied to the batten to prevent this top hem stretching, and altering the set of the sail. To attach the boom and batten to the mast bend an inch wide piece of sheet aluminium round the mast and sail and put a small bolt through the boom (and batten).
Rear
Mast Step: (back
to top)
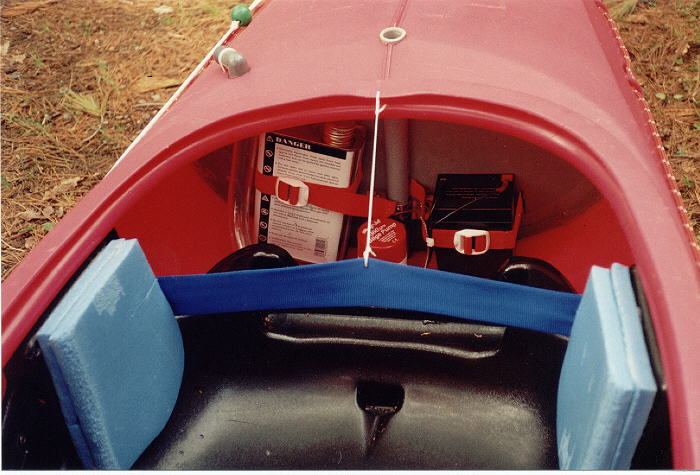 This
shows the rear mast step. Not shown is the aluminium bracket at the
bottom
of the mast step,bolted through the bulkhead. At the back of the
bulkhead
is a piece of 1/8" marine plywood, the shape of the bulkhead. This is
because
the bulkheads are soft rubber, and you need something more solid to
bolt
things to. The straps holding the battery, and the fuel can, also go
through
this plywood.
This
shows the rear mast step. Not shown is the aluminium bracket at the
bottom
of the mast step,bolted through the bulkhead. At the back of the
bulkhead
is a piece of 1/8" marine plywood, the shape of the bulkhead. This is
because
the bulkheads are soft rubber, and you need something more solid to
bolt
things to. The straps holding the battery, and the fuel can, also go
through
this plywood.
Old
Town Kayak:
(back to top)
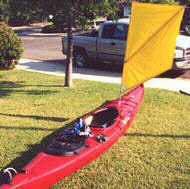 Old
Town Kayak with similar rig
Old
Town Kayak with similar rig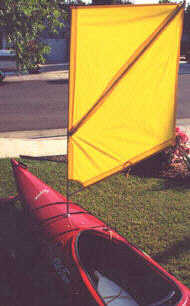
Old Town photos by
Dennis Crawford, California.